
Your site migration went live Friday at 5pm. By Monday morning, Google Search Console shows 847 new 404 errors. Half your organic traffic vanished over the weekend. The redirect mapping looked perfect in testing—what happened?
This is the hidden reality of site migrations: most broken links appear days or weeks after launch, not during it. While your one-time crawler validates the initial migration, links continue breaking as caches expire, CDNs propagate, and search engines discover mismatches. By then, your SEO rankings have already dropped.
In this guide, we'll show you why migrations break links, how to prevent it, and the monitoring strategy that catches what traditional audits miss.
Why Site Migrations Break Links
Site migrations fail in three predictable ways. Understanding these patterns helps you catch issues before they damage your rankings.
1. URL Structure Changes (40% of Breaks)
When you change how URLs are formatted, forgotten mappings create dead ends.
Common scenarios:
- Permalink format changes:
/blog/post/→/articles/post - Query parameters removed:
?id=123→/post/slug - Category paths added/removed:
/products/item/→/item - Subdomain consolidation:
blog.example.com→example.com/blog
| Old URL | New URL | Issue |
|---|---|---|
example.com/products?id=42 | example.com/products/blue-widget | No redirect for parameterized URL |
example.com/archive/2024/ | example.com/blog/archive-2024/ | Path structure changed |
blog.example.com/post/ | example.com/blog/post/ | Subdomain migrated |
2. Missing Redirect Mappings (35% of Breaks)
Not all URLs get documented. Legacy content, tag pages, and third-party URLs create silent failures.
Untracked URL categories:
- Old blog archives that no longer appear in navigation
- Tag pages and filtered category views
- Dynamic pages from previous platforms
- Legacy URLs that external sites link to
If a page isn't in your sitemap or analytics, it's easy to forget it exists. But search engines, social media platforms, and referring sites still link to it. When those links die, your domain reputation takes a hit.
3. Redirect Implementation Errors (25% of Breaks)
Even when redirects are mapped, implementation mistakes create failures.
Common errors:
- Redirect chains (old → temp → new instead of direct 301s)
- Wrong status codes (302 temporary instead of 301 permanent)
- Case sensitivity mismatches (WordPress URLs → Linux servers)
- Cache poisoning (old redirects cached at CDN level for weeks)
Why this matters:
| Issue | SEO Impact | User Experience | Detection Speed |
|---|---|---|---|
| Missing 301s | -40% traffic loss | 404 errors | Hours |
| Redirect chains | -15% speed penalty | Slow loads | Days |
| Soft-404s | -30% indexing reduction | Confusing UX | Weeks |
| Cache issues | Variable | Intermittent 404s | Days to weeks |
The Pre-Migration Link Audit
You can't monitor what you don't know exists. Start with a complete inventory of your current site.
Step 1: Export Your Complete URL Inventory
Use multiple sources to ensure completeness:
Tools:
- XML Sitemaps (most complete)
- Screaming Frog SEO Spider (crawls actual links)
- Google Analytics (real traffic patterns)
- Search Console (indexed pages)
What to capture for each URL:
- Full URL
- HTTP status code
- Redirect chains (if any)
- Canonical tags
- Traffic volume
- Backlink count
This creates your baseline for comparison after migration.
Why multiple sources matter: A single tool might miss URLs. Screaming Frog crawls linked pages but ignores pages with no inbound links. Google Analytics shows what users visit but misses deep archive pages. Search Console shows Google's indexed inventory but lags behind actual content. By combining all four sources, you catch 95%+ of your URL universe. The remaining 5% (truly orphaned URLs) matter less since they have no traffic or discovery path anyway.
Export process:
- Download XML sitemap(s) from your server (
sitemap.xmlor sitemap index) - Crawl your site with Screaming Frog (set to export all URLs with status codes)
- Export your top 500 pages from Google Analytics (by traffic volume)
- Download the URL list from Search Console (Coverage → Valid)
- Combine all lists and deduplicate (you should have 20-40% fewer URLs after deduplication)
Step 2: Document Your URL Transformation Rules
Map exactly how old URLs become new URLs:
Pattern mapping example:
Old: example.com/products/?id=123&cat=shoes
New: example.com/shoes/shoes-product-name

Pattern: /products/?id=X&cat=Y → /Y/X-slug
Capture every rewrite rule:
- WordPress pretty permalinks → new structure
- Category path changes
- Query parameter transformations
- Subdomain consolidations
This documentation prevents missed redirects during implementation.
Step 3: Identify Your High-Value Pages
Monitor Tier 1 URLs first—prioritize by business impact:
| Priority | Criteria | Examples |
|---|---|---|
| Tier 1 (Monitor Hourly) | Exceeds 100 visits/month + backlinks | Products, key articles, landing pages |
| Tier 2 (Monitor Daily) | 50-100 visits/month | Category pages, guide articles |
| Tier 3 (Monitor Weekly) | Fewer than 50 visits/month | Archive pages, old blog posts |
Focus your post-migration monitoring on Tier 1 URLs. They generate revenue and drive organic traffic—broken Tier 1 URLs cost real money.
During Migration: Redirect Mapping Best Practices
Implementation quality determines whether your traffic survives migration day.
Build One-to-One Redirects
Every old URL needs a direct new destination:
✓ Correct:
old.com/page-1/ → new.com/page-one/ (direct)
old.com/archive/?id=5 → new.com/archive/page-5/ (direct)
✗ Wrong:
old.com/page-1/ → temp-domain.com/migrate/ → new.com/page-one/ (chain)
old.com/article/ → new.com/ (generic catch-all)
Generic redirects (everything → homepage) harm SEO and destroy user experience. Google interprets these as intentional deletions. You lose link juice, authority transfers, and ranking positions.
Why one-to-one matters: Each redirect is a communication to search engines: "This page moved here." When you redirect /old-article/ → homepage, you're saying "this article doesn't exist on the new site," even if it does. Google sees this as content deletion and drops your rankings for that article's keywords.
With one-to-one redirects, you preserve link equity. A page with 50 external backlinks now passes that authority to the new URL. One-to-one redirects maintain your site's search authority through migration—generic redirects destroy it.
Avoid Redirect Chains
Each redirect hop adds 200-500ms latency and reduces PageSpeed scores:
Redirect chain timeline:
- Hop 1: 100ms (basic)
- Hop 2: +250ms (cumulative)
- Hop 3: +400ms (cascading)
- Result: +650ms page load time
For commerce sites, 650ms slower loads = measurable conversion rate drops. For news sites, it means fewer page impressions during peak traffic.
How chains happen:
- Multiple migrations from dev → staging → production
- Temporary redirects left in place
- Old platform URLs → new platform URLs → final destination
Chain detection: You won't see redirect chains in your redirect rules file. They appear when old redirects from previous migrations are never removed. If you migrated once before (or tested the migration multiple times), temporary redirects can accumulate. Use curl to trace the chain:
curl -iL old-site.com/page/
# Follow the Location: header through all redirects
# Count how many hops before reaching the final page
Anything more than 1 hop needs fixing.
Test Before Launch
Validate redirect correctness on staging:
- Test 10% sample of URLs (random selection, not just homepage)
- Verify status codes (301 for permanent, not 302)
- Check destination URLs load correctly
- Use Google Search Console Preview to test new sitemap
Handle Edge Cases
Don't forget URLs that aren't in your primary navigation:
- Pagination URLs (
/page/2/,/page/3/) - Date-based archives (
/2024/01/15/) - Tag and category pages
- Public API endpoints (if applicable)
- Legacy filter/search parameters
Missing these creates scattered 404s that damage SEO gradually rather than catastrophically—harder to notice and harder to fix.
Post-Migration: The 30-Day Monitoring Plan
One-time crawls aren't enough. The first 30 days after migration determine your SEO recovery.
Why One-Time Crawls Miss Failures
Your migration looks perfect on day 1, then breaks gradually:
Cache expiration timeline:
- CDN cache: 24-48 hours
- Browser cache: 7 days
- Cloudflare cache: 24 hours or custom
- Search engine cache: 1-4 weeks
The compounding effect:
- Day 1: All old URLs redirect correctly (cached pages haven't refreshed yet)
- Day 3: CDN caches expire, some old URLs broken (cached redirect gone)
- Day 7: Browser caches expire, users see 404s
- Week 4: Google recrawls, discovers broken links, drops rankings
Real incident: E-commerce migration on Friday at 5pm. Site looked perfect when tested at 4pm. By Monday morning, 847 errors appeared as caches expired over the weekend.
Days 1-7: Hourly Monitoring
Monitor all Tier 1 URLs (high-value pages) every hour:
What to check:
- Status codes (200 for live, 301 for redirects)
- Redirect chains (should be 1 hop, not 2+)
- Response times (should be under 500ms)
- Content validation (page loads and displays correctly)
Alert on:
- Any 404 (instant red flag)
- Timeout errors (longer than 5 seconds)
- Redirect chains (2+ hops)
- Status code changes (200 → 403)
Why hourly matters during days 1-7: During the first week, issues emerge rapidly as caches expire and search engines re-crawl. An hourly check means you'll catch 404 errors within 60 minutes instead of waiting for daily reports. For e-commerce sites, that difference determines whether you fix it before customers find it or after complaints arrive in support emails.
Example alert response:
- 2pm: Alert arrives: "product-1234 now returning 404"
- 2:15pm: Dev checks redirect rules, finds missing product ID mapping
- 2:45pm: Fix deployed
- 3:00pm: Hourly check confirms URL now returns 200
- Total downtime: ~1 hour (customer impact minimal)
Without hourly monitoring, you'd discover this 24 hours later when daily reports arrive.
Tools: Automated monitoring service (manual testing won't catch everything)
Days 8-14: Daily Audits with New URL Discovery
Continue daily monitoring while expanding coverage:
New URLs to add:
- URLs discovered through referral traffic (Google Analytics)
- URLs from Search Console (Google crawled these)
- Tag pages and category pages (users are finding these)
- Legacy URLs from web.archive.org (external links still point here)
Checks to perform:
- Test from multiple geographic locations (different CDN nodes)
- Verify mobile redirects match desktop behavior
- Check AMP/Progressive Web App variants (if applicable)
- Soft-404 detection (pages that return 200 but show error content)
Days 15-30: Weekly Audits and Pattern Analysis
Shift from individual URL monitoring to pattern analysis:
Weekly audit checklist:
- Review status change history (which URLs are unstable?)
- Identify error patterns (specific URL types breaking?)
- Adjust redirect rules based on findings
- Add missed URL categories to monitoring
Traffic recovery tracking:
- Organic traffic trending upward?
- Bounce rates normalizing?
- Time-on-page metrics improving?
By week 4, traffic should recover to 95%+ of pre-migration levels (accounting for normal seasonal variation).
The DLR Migration Workflow
Here's how to implement continuous migration monitoring using DeadLinkRadar:
Step 1: Pre-Migration Baseline (1 week before)
Actions:
- Export all current URLs (CSV or text file)
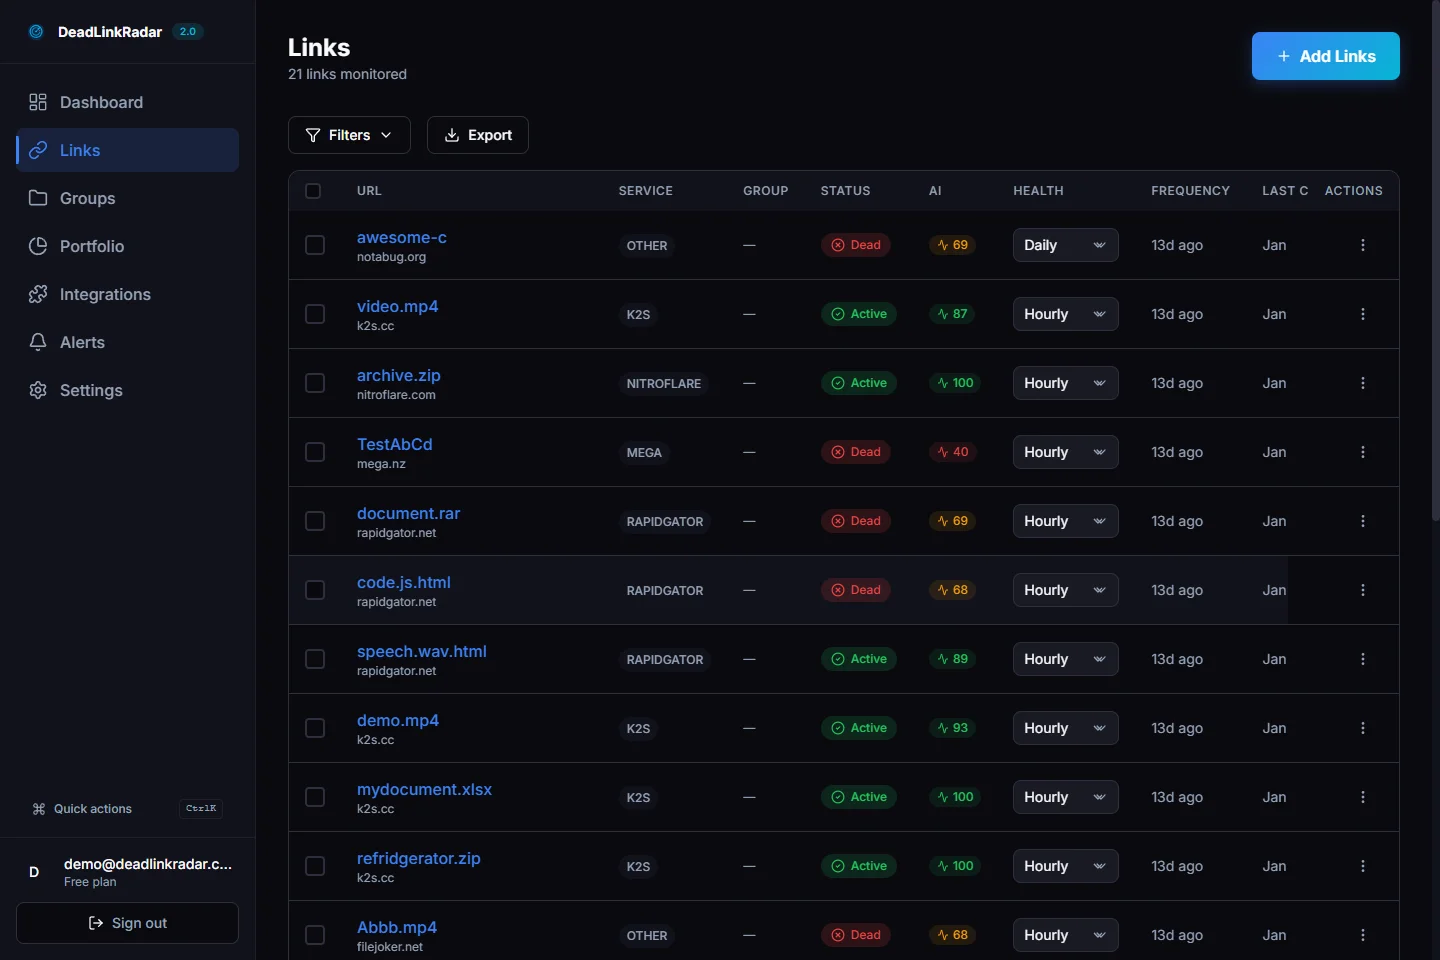
- Bulk import to DLR
- Organize into groups: Tier 1, Blog, Products, Services
- Enable daily monitoring frequency
Import format:
https://example.com/product/item-1
https://example.com/blog/article-1
https://example.com/category/shoes
Organization strategy: Group by business impact, not by URL structure. Put high-traffic, high-value pages in the Tier 1 group so you can immediately switch to hourly monitoring on migration day. Leave lower-value URLs on daily checking—you can catch issues with them later.
Pre-migration snapshot: By creating this baseline a week before migration, you have a reference point. After migration, any change in status codes, redirect chains, or response times immediately reveals problems.
Step 2: Migration Day Setup (morning of launch)
Actions:
- Increase check frequency to hourly (Tier 1 URLs only)
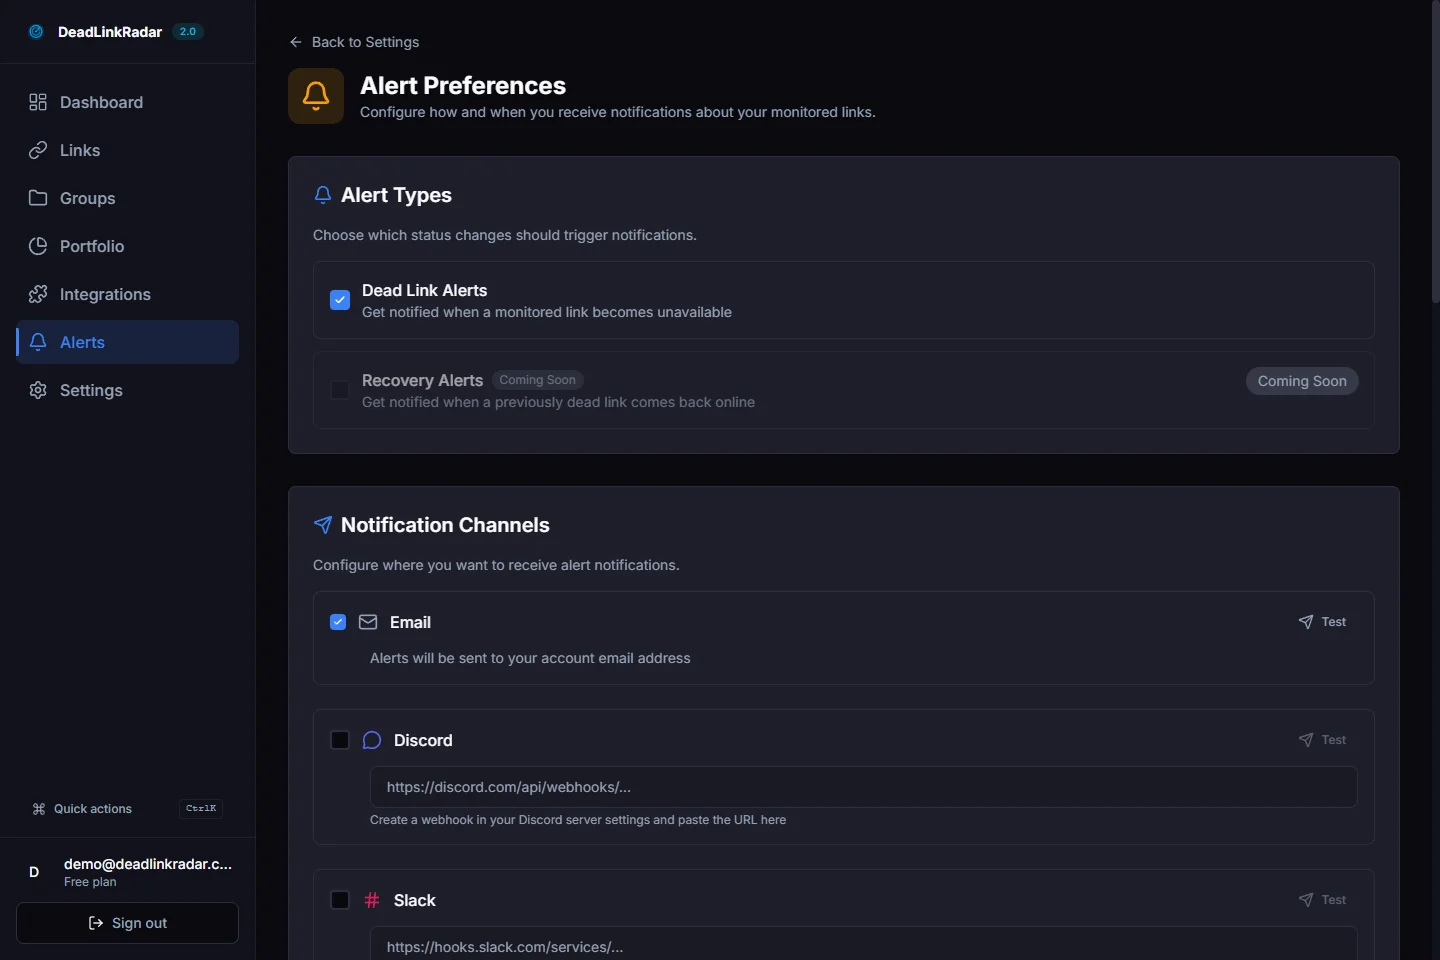
- Enable multi-channel alerts: email, Slack, Discord
- Create real-time dashboard view (filtered by Tier 1)
Team coordination:
- Designate someone to monitor alerts during migration
- Have deployment team standing by to fix redirects
- Set up war room communication (Slack channel)
- Define escalation: if 404 rate exceeds 5%, pause marketing campaigns
Alert channels:
- Email: formal notifications for logging/records
- Slack: real-time team communication during crisis
- Discord: optional if you use Discord for team chat
Step 3: Post-Migration Monitoring (days 1-30)
Real-time monitoring:
- Monitor status changes every hour (days 1-7)
- Track redirect chains automatically
- AI soft-404 detection catches invisible breaks
- Export broken URLs to CSV for batch fixing
Daily review checklist:
- Review hourly scan results
- Identify new 404s and investigate root cause
- Group similar errors (are all product pages broken? all blog posts?)
- Adjust redirect rules based on patterns

Week 2 expansion:
- Add URLs discovered via referral traffic
- Monitor tag pages, filters, search results
- Continue hourly checks for Tier 1, switch Tier 2 to daily
Step 4: Issue Resolution
When issues appear:
- Export broken URLs grouped by error type
- Fix redirects in your web server config
- Re-check status after fixes
Fix workflow:
- Export broken URLs (filter by 404)
- Analyze pattern (missing mappings? wrong redirects? typos?)
- Batch fix in your redirect rules
- Deploy fix to staging first (test)
- Deploy to production
- Wait 15-30 minutes for DLR hourly scan to confirm
- If still 404, investigate further; might be caching issue
Real Migration Case Study: E-Commerce Platform Switch
Scenario: WooCommerce (WordPress) → Shopify migration
- 3500 product URLs
- 800 blog posts
- 200 category pages
- Total: 4500 URLs
Pre-migration prep (1 week before):
- Exported all URLs via WordPress API + Screaming Frog
- Imported 4500 URLs to DLR
- Set baseline monitoring at daily frequency
Migration day (Friday 5pm launch):
- Increased monitoring to hourly
- Enabled Slack alerts for any status changes
- Team ready to respond immediately
Issues caught and resolution:
| Day | Issue | URLs Affected | Root Cause | Resolution Time |
|---|---|---|---|---|
| 1 | Product 404s | 23 | SKU mapping error in Shopify | 2 hours |
| 3 | Redirect chains | 150 | WP permalink → temp URL → Shopify | 4 hours |
| 7 | Soft-404 errors | 12 | Shopify returns 200 but shows "not found" | 6 hours |
| 14 | Legacy URLs | 5 | Old affiliate links discovered via referral traffic | 1 hour (redirects already mapped) |
Results:
- 95% of issues caught within 48 hours
- Traffic recovered to 98% of pre-migration levels by week 4
- Zero issues discovered by customers (all caught via monitoring)
- Total monitoring cost: minimal
- Revenue impact: avoided -$12k/week during recovery
Migration Best Practices Checklist
Before Migration
- Export complete URL inventory from all sources
- Document URL transformation rules
- Identify Tier 1 URLs (high-value pages)
- Create redirect mapping spreadsheet
- Set up monitoring baseline
During Migration
- Test redirect map on staging environment
- Verify no redirect chains (direct 301s only)
- Test from multiple locations and devices
- Handle edge cases (pagination, archives, search parameters)
- Keep old site accessible during testing period
After Migration (30-Day Plan)
Days 1-7:
- Hourly monitoring of all Tier 1 URLs
- Daily email alerts of any status changes
- Team on-call for immediate fixes
- Export and fix critical errors within 2 hours
Days 8-14:
- Daily monitoring continues
- Add new URLs discovered via traffic
- Analyze error patterns and adjust rules
- Test from different geographic locations
Days 15-30:
- Weekly status audits
- Pattern analysis and optimization
- Traffic recovery tracking
- Deactivate hourly monitoring (switch to daily)
Mistakes to Avoid
-
❌ Using 302 (temporary) redirects instead of 301 (permanent)
- 302 tells search engines: "This redirect is temporary, re-index the old URL later"
- Google won't consolidate ranking signals to the new URL
- Use 301 for permanent migrations
-
❌ Generic redirects that send everything to homepage
- Destroys link equity and SEO rankings
- Users land on homepage instead of relevant page
- Creates poor user experience and bounce rates
-
❌ Skipping edge case URLs (pagination, archives)
- These aren't in main navigation but have external links
- Missing redirects for these pages creates silent 404s
- Affects 5-15% of broken links from external referral traffic
-
❌ Disabling the old site before verifying all redirects
- Create a cutover checklist; don't rush this step
- Verify redirects for 48 hours before disabling old domain
- If old site goes down and redirects fail, customers get 404s indefinitely
-
❌ Relying only on one-time crawl, then forgetting to monitor
- One-time crawl is a point-in-time snapshot
- Links break gradually as caches expire
- You need continuous monitoring for 30 days minimum
Getting Started with Your Migration
Ready to protect your site from migration disasters?
Immediate next steps:
- Export your URLs — Use your sitemap, search console export, or Screaming Frog
- Set up monitoring — Import URLs before your migration date
- Configure alerts — Enable email, Slack, or Discord notifications
- Document patterns — Map old → new URL transformations
- Test thoroughly — Run through your redirect map on staging
Key DLR features for migrations:
- Bulk import (CSV, text file, JSON formats)
- Real-time status tracking with history
- Multi-channel alerts (email, Slack, Discord, teams)
- Automatic soft-404 detection
- Export broken URLs for fixing
Start your migration monitoring free today →
Related guides: