
You've worked hard building links, publishing content, and establishing your online presence. Your site is crawling up the search rankings. Traffic is growing.
Then one day, you check your analytics. Bounce rates are up. Users are complaining. You investigate and discover the problem: half your links are broken.
The file hosting site changed their URL structure. Your payment gateway updated their API. Your affiliate program went under. Meanwhile, search engines have been penalizing you for weeks because of those dead links.
You didn't know until it was too late.
This is the core problem broken link alerts solve: instant awareness when links die, so you can fix them before they hurt your SEO, revenue, or user experience.
In this guide, we'll show you how to set up broken link alerts across 6 notification channels using DeadLinkRadar. By the end, you'll have a monitoring system that catches dead links the moment they happen—not weeks later when the damage is done.
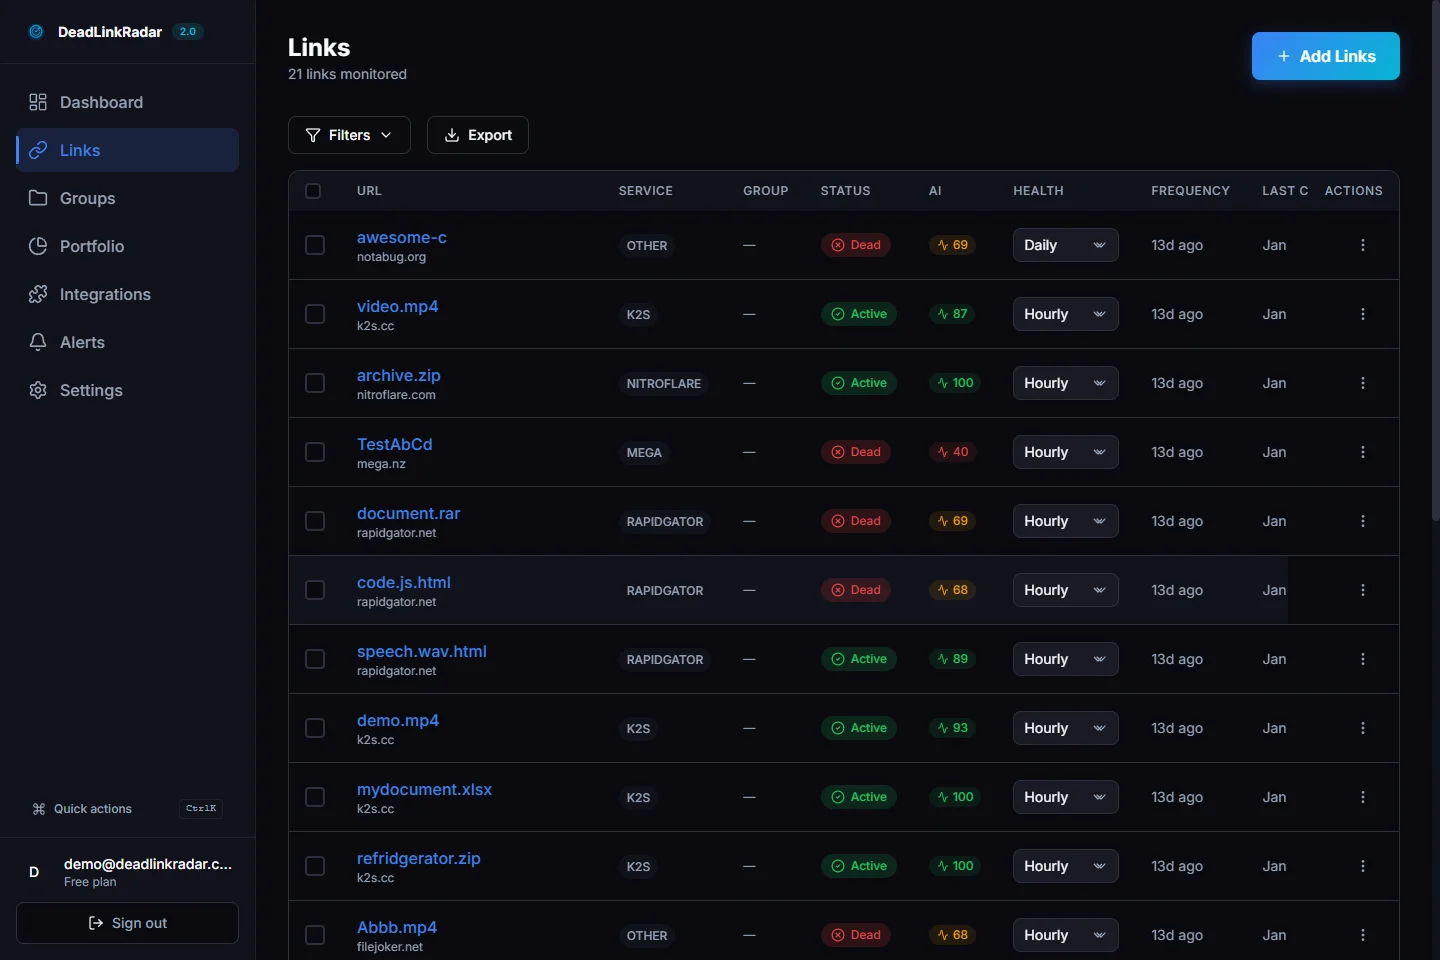
Notification channels overview (click to view full size)
The Problem: Broken Links Fail Silently
Broken links don't announce themselves. They fail quietly while:
- Search engines penalize your rankings - Google sees broken links as poor user experience
- Users bounce from your site - 404 errors kill trust and conversions
- Revenue opportunities disappear - Affiliate links, product pages, payment flows all break
- Your reputation suffers - Professional sites don't have broken links everywhere
The worst part? You only discover broken links when you manually check. By then:
- Search rankings have already dropped
- Users have already left negative reviews
- Competitors have already taken your traffic
- Revenue has already been lost
Manual checking doesn't scale. You need automated broken link alerts that notify you the instant a link dies.
What You'll Learn
This guide covers:
- Why broken link alerts matter - The real cost of late detection
- Alert preferences overview - Understanding notification channels
- Email alerts - The most common notification method
- Discord notifications - Perfect for development teams
- Slack integration - Enterprise team collaboration
- Telegram bot alerts - Mobile-first instant notifications
- Microsoft Teams - Corporate notification workflows
- Generic webhooks - Custom integrations and automation
- Digest scheduling - Batch alerts vs. instant notifications
- Alert customization - Filtering what matters
- Testing your setup - Verify notifications work
- Best practices - Optimize your alert strategy
Reading time: 16-19 minutes Skill level: Beginner to Intermediate Prerequisites: DeadLinkRadar account (free tier works)
Why Broken Link Alerts Matter
Before we dive into setup, let's understand why you need automated alerts.
The Cost of Late Detection
Every day a broken link goes undetected costs you:
SEO Impact:
- Google crawls your site and finds 404 errors
- Page authority decreases with each crawl
- Rankings drop as user experience signals worsen
- Recovery takes weeks even after fixing links
Revenue Loss:
- Affiliate links stop converting (lost commissions)
- Product pages return 404s (lost sales)
- Payment gateways break (abandoned carts)
- Sponsored content links die (contract violations)
User Experience:
- Visitors hit dead ends and leave
- Trust in your site decreases
- Negative reviews mention broken links
- Bounce rates spike, hurting all metrics
Time Waste:
- Manual checking requires hours per week
- Finding broken links is reactive, not proactive
- Team members report issues ad-hoc
- No systematic process for link health
What Instant Alerts Prevent
With broken link alerts, you:
- Catch issues within hours - Not weeks or months
- Fix links before SEO damage - Minimize ranking impact
- Maintain user trust - No embarrassing 404 pages
- Protect revenue - Keep affiliate/payment links working
- Save time - No manual checking needed
- Sleep better - Know you'll be alerted if something breaks
Real example: A SaaS company discovered their payment gateway URL changed. Without alerts, they lost 2 weeks of signups (~$15,000). With alerts, they would've fixed it within hours.
Alert Preferences Overview
DeadLinkRadar supports 6 notification channels, each designed for different workflows:
| Channel | Best For | Setup Time | Mobile Friendly |
|---|---|---|---|
| Individual users, digest reports | 2 minutes | ⭐⭐⭐ | |
| Discord | Dev teams, community channels | 5 minutes | ⭐⭐⭐⭐ |
| Slack | Enterprise teams, workspaces | 5 minutes | ⭐⭐⭐⭐ |
| Telegram | Solo devs, instant mobile alerts | 3 minutes | ⭐⭐⭐⭐⭐ |
| Microsoft Teams | Corporate environments | 7 minutes | ⭐⭐⭐⭐ |
| Generic Webhook | Custom automation, Zapier, n8n | 10 minutes | Varies |
Which channel should you use?
- Solo developer? Start with Email or Telegram
- Small team? Discord or Slack
- Enterprise? Microsoft Teams + Email
- Automation fan? Generic Webhook + your own scripts
You can enable multiple channels simultaneously. Many users set up:
- Email for digest reports (daily summary)
- Discord/Slack for instant alerts (real-time)
- Webhook for custom automation (tickets, dashboards)
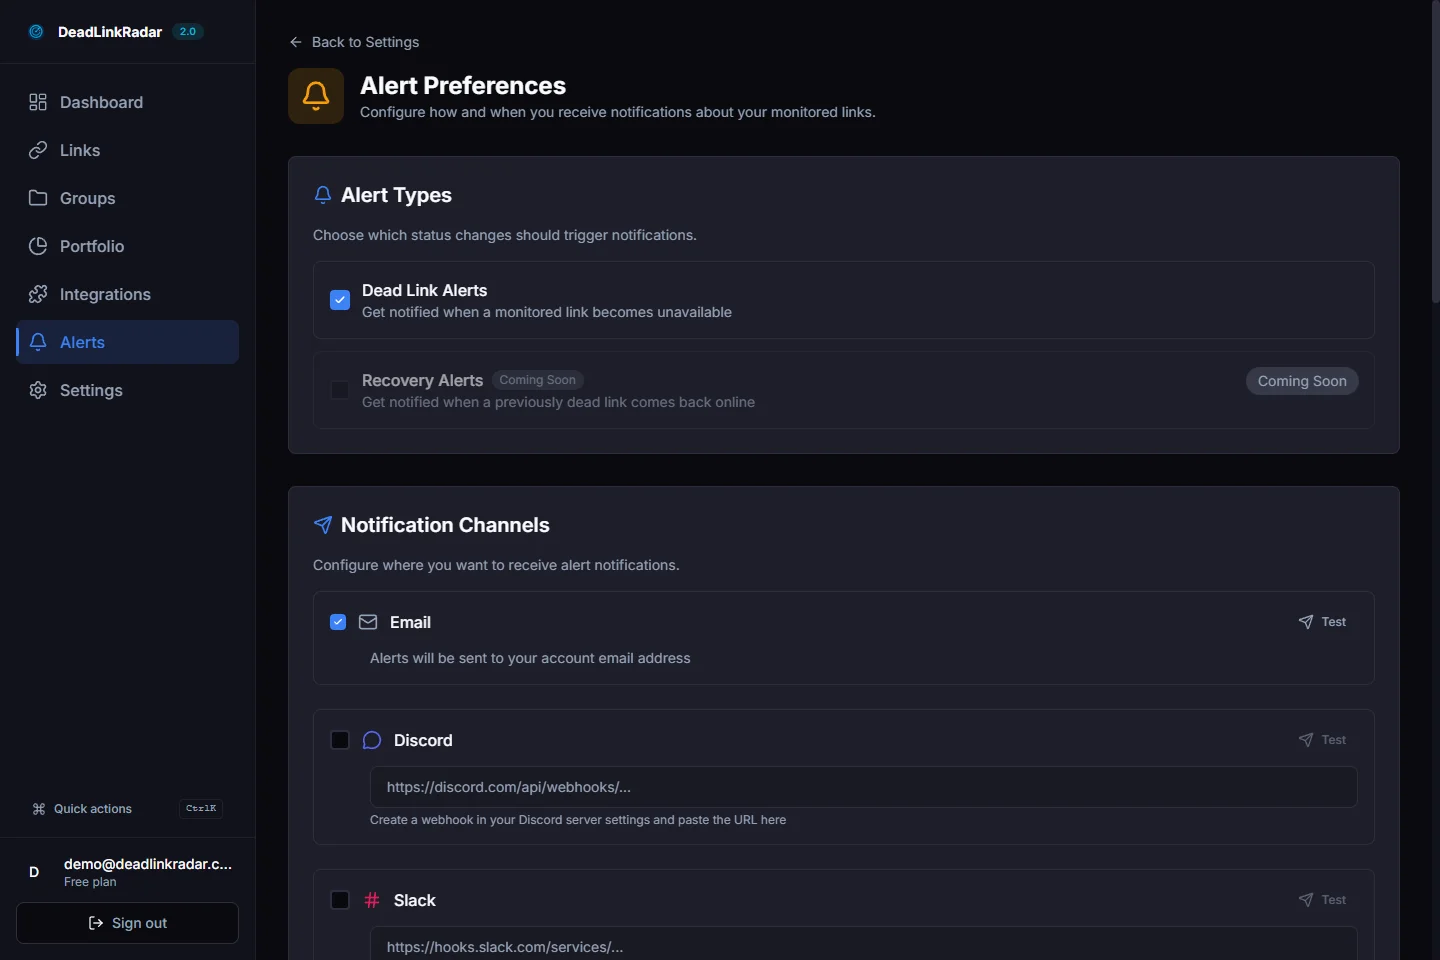
Alert preferences dashboard (click to view full size)
Setting Up Email Alerts
Email is the most common notification channel. Here's how to configure it.
Step 1: Navigate to Notification Settings
- Log in to DeadLinkRadar
- Go to Dashboard → Settings → Notifications
- Scroll to the Email Alerts section
Step 2: Configure Email Preferences
DeadLinkRadar sends email alerts via Resend (our email provider). You'll see:
Instant Alerts:
- ✅ Notify immediately when links break - Send alert as soon as dead link detected
- ⏰ Digest scheduling - Batch alerts into daily/weekly reports (covered later)
Email Content:
- Link URL that broke
- Timestamp when it was detected
- HTTP status code (404, 500, etc.)
- Page where the link appears (if tracked)
- Quick action buttons (Mark Fixed, Ignore, View Details)
Step 3: Test Email Notifications
To verify your setup:
- Click Send Test Email button
- Check your inbox (including spam folder)
- Verify the email format looks correct
- Click action buttons to ensure they work
Troubleshooting:
- Email not arriving? Check spam/promotions folders
- Unsubscribed accidentally? Re-enable in Email Preferences
- Want to unsubscribe? Click unsubscribe link in any email footer
Email Alert Best Practices
DO:
- Enable instant alerts for critical links (payment, affiliate, product pages)
- Use daily digests for less urgent links (blog posts, reference links)
- Set up email filters/labels to organize alerts
- Review unsubscribe settings if email volume gets high
DON'T:
- Ignore alerts for weeks (defeats the purpose)
- Rely solely on email if you manage 1000+ links (use Slack/Discord)
- Send all alerts to a shared inbox (notifications get buried)
Setting Up Discord Notifications
Discord is perfect for development teams who live in Discord channels. Here's how to send broken link alerts to Discord.
Step 1: Create a Discord Webhook
- Open Discord and go to your server
- Select the channel where you want alerts (e.g.,
#monitoring,#alerts) - Click channel settings (⚙️ icon)
- Go to Integrations → Webhooks
- Click New Webhook
- Name it "DeadLinkRadar" (or anything you prefer)
- Copy the Webhook URL (looks like
https://discord.com/api/webhooks/...)
Step 2: Add Webhook to DeadLinkRadar
- In DeadLinkRadar, go to Settings → Notifications
- Scroll to Discord Notifications
- Paste your webhook URL
- Click Save
Step 3: Test Discord Notifications
- Click Send Test Notification
- Check your Discord channel
- You should see a message like:
🔗 DeadLinkRadar Alert
❌ Dead link detected

URL: https://example.com/broken-page
Status: 404 Not Found
Detected: 2026-01-05 14:32 UTC

[View Details] [Mark Fixed]
Discord Alert Customization
Channel Organization:
- Create separate channels for different alert types
#critical-alerts- Payment, affiliate, product links#general-alerts- Blog posts, reference links#link-monitoring- All notifications
Webhook Features:
- Custom avatar/username for the bot
- Rich embeds with color coding (red = broken, green = fixed)
- Mention
@hereor@rolefor urgent alerts (configure in webhook settings)
Discord Best Practices
DO:
- Use separate channels per project/site
- Enable notifications for critical channels only
- Archive old alerts periodically
- Document webhook URLs in team wiki
DON'T:
- Post to
#general(alerts get lost in chat) - Spam channels with non-critical alerts
- Share webhook URLs publicly (anyone can post to them)
- Delete webhooks without updating DeadLinkRadar settings
Setting Up Slack Integration
Slack integration works similarly to Discord but includes enterprise features like app approvals and permissions.
Step 1: Create a Slack Incoming Webhook
- Go to your Slack workspace
- Visit Slack API Apps
- Click Create New App → From scratch
- Name it "DeadLinkRadar" and select your workspace
- Go to Incoming Webhooks in the sidebar
- Toggle Activate Incoming Webhooks to On
- Click Add New Webhook to Workspace
- Select the channel (e.g.,
#monitoring) - Click Allow
- Copy the Webhook URL
Step 2: Add Webhook to DeadLinkRadar
- In DeadLinkRadar, go to Settings → Notifications
- Scroll to Slack Notifications
- Paste your webhook URL
- Click Save
Step 3: Test Slack Notifications
- Click Send Test Notification
- Check your Slack channel
- Verify the message appears with:
- Link URL
- Status code
- Timestamp
- Action buttons
Slack Alert Features
Slack notifications include:
Rich Formatting:
- Color-coded attachments (red = broken, yellow = warning, green = fixed)
- Inline action buttons (Mark Fixed, Ignore, View Details)
- Thread support for alert discussions
Enterprise Features:
- App approval workflows (if required by workspace admins)
- Channel permissions (control who sees alerts)
- Integration with Slack workflows (trigger automations)
Slack Best Practices
DO:
- Create dedicated monitoring channels
- Use channel naming conventions (
#alerts-production,#alerts-staging) - Enable notifications for critical channels only
- Pin important alert summaries
DON'T:
- Send alerts to
#randomor#general - Overwhelm channels with low-priority alerts
- Ignore Slack workspace security policies
- Use personal DMs for team-wide alerts
Setting Up Telegram Bot Alerts
Telegram is perfect for solo developers who want instant mobile notifications without setting up a team workspace.
Step 1: Create a Telegram Bot
- Open Telegram and search for @BotFather
- Start a chat and send
/newbot - Follow prompts to name your bot (e.g., "DeadLinkRadar Alerts")
- BotFather will give you a bot token (looks like
123456789:ABCdefGHIjklMNOpqrsTUVwxyz) - Save this token somewhere safe
Step 2: Get Your Chat ID
- Start a chat with your new bot
- Send any message (e.g., "test")
- Visit:
https://api.telegram.org/bot<YOUR_BOT_TOKEN>/getUpdates - Look for the chat ID field in the JSON response (e.g.,
"id": 123456789) - Save your chat ID
Step 3: Add to DeadLinkRadar
- In DeadLinkRadar, go to Settings → Notifications
- Scroll to Telegram Notifications
- Paste your bot token
- Paste your chat ID
- Click Save
Step 4: Test Telegram Notifications
- Click Send Test Notification
- Check your Telegram chat with the bot
- You should receive a message like:
🔗 DeadLinkRadar Alert

❌ Dead link detected

URL: https://example.com/broken-page
Status: 404 Not Found
Detected: 2026-01-05 14:32 UTC

View Details | Mark Fixed
Telegram Alert Features
Mobile-First:
- Instant push notifications to your phone
- No need to open a browser
- Works offline (messages queue until connected)
Rich Formatting:
- Emoji indicators (❌ = broken, ✅ = fixed)
- Inline action buttons
- Link previews
Telegram Best Practices
DO:
- Mute notifications during sleep hours (Telegram settings)
- Enable "Pinned Messages" for critical alerts
- Create separate bots for different projects
- Use Telegram groups for team notifications
DON'T:
- Share your bot token publicly (anyone can spam your bot)
- Use your personal chat ID for team alerts
- Ignore alerts for days (defeats instant notification purpose)
Setting Up Microsoft Teams Notifications
Microsoft Teams is ideal for corporate environments that already use Teams for collaboration.
Step 1: Create an Incoming Webhook in Teams
- Open Microsoft Teams
- Go to the channel where you want alerts
- Click ⋯ (More options) → Connectors
- Search for "Incoming Webhook"
- Click Configure
- Name it "DeadLinkRadar"
- Optionally upload a custom icon
- Click Create
- Copy the Webhook URL
Step 2: Add Webhook to DeadLinkRadar
- In DeadLinkRadar, go to Settings → Notifications
- Scroll to Microsoft Teams Notifications
- Paste your webhook URL
- Click Save
Step 3: Test Teams Notifications
- Click Send Test Notification
- Check your Teams channel
- Verify the message appears with:
- Adaptive Card format
- Link details
- Action buttons
Teams Alert Features
Adaptive Cards:
- Rich, interactive cards with structured data
- Action buttons (Mark Fixed, Ignore, View Details)
- Color-coded alerts (red = broken, green = fixed)
Enterprise Features:
- Integration with Teams workflows
- Compliance with corporate security policies
- Audit logs for notification history
Teams Best Practices
DO:
- Create dedicated monitoring channels
- Use Teams permissions to control access
- Enable notifications for critical channels only
- Integrate with Power Automate for advanced workflows
DON'T:
- Send alerts to general channels (noise)
- Overwhelm channels with low-priority alerts
- Ignore corporate IT policies on webhooks
- Use personal chat for team-wide alerts
Setting Up Generic Webhook Alerts
Generic webhooks are the most flexible option. They let you send broken link alerts to any service that accepts HTTP POST requests: Zapier, n8n, Make, custom scripts, internal dashboards, ticketing systems, and more.
Step 1: Understand the Webhook Payload
When a link breaks, DeadLinkRadar sends a POST request to your webhook URL with a JSON payload containing:
- event - "link.broken" (the event type)
- timestamp - ISO 8601 datetime when the event occurred
- link - Object with link details:
- id: Unique link identifier
- url: The broken link URL
- status_code: HTTP status code (404, 403, 503, etc.)
- checked_at: When the check occurred
- previous_status: Link status before breaking
- site - Object with website details:
- id: Unique site identifier
- domain: Website domain
Step 2: Set Up Your Webhook Endpoint
You have several options:
Option A: Use Zapier/Make/n8n
- Create a new Zap/Scenario/Workflow
- Use "Webhooks by Zapier" trigger (or equivalent)
- Copy the webhook URL provided
- Configure actions (send Slack message, create ticket, update spreadsheet, etc.)
Option B: Use Your Own Server
- Create an endpoint that accepts POST requests
- Parse the JSON payload
- Implement your custom logic (send email, create ticket, etc.)
- Return 200 OK response
Option C: Use Serverless Function
- Deploy a function to Vercel, Netlify, AWS Lambda, etc.
- Configure function to parse JSON payload
- Implement notification logic
- Use function URL as webhook
Step 3: Add Webhook to DeadLinkRadar
- In DeadLinkRadar, go to Settings → Notifications
- Scroll to Generic Webhook
- Paste your webhook URL
- Optionally add a signing secret (for HMAC verification)
- Click Save
Step 4: Test Webhook Notifications
- Click Send Test Notification
- Check your webhook receiver
- Verify the payload is received and processed correctly
Webhook Security
HMAC Signing (Recommended):
If you provide a signing secret, DeadLinkRadar will:
- Generate HMAC-SHA256 signature of the payload
- Send signature in
X-Signatureheader - You verify the signature to ensure authenticity
Verification example (Node.js):
To verify webhook authenticity, implement HMAC-SHA256 verification:
- Get the signature from the
X-Signatureheader - Create an HMAC-SHA256 hash of the payload using your secret key
- Compare the hashes - they must match exactly
- If they don't match, reject the request with a 401 Unauthorized response
The signature format is sha256=<hex-encoded-hash> where the hash is computed from the raw JSON payload bytes.
Webhook Use Cases
Automation:
- Create Jira/Linear tickets automatically
- Update Google Sheets with broken links
- Trigger AWS Lambda functions for custom logic
Integration:
- Send to multiple channels (Slack + Discord + Email)
- Add to monitoring dashboards (Grafana, Datadog)
- Log to databases for analytics
Custom Workflows:
- Auto-fix known issues (e.g., update affiliate links)
- Escalate critical links to on-call engineer
- Track link health trends over time
Generic Webhook Best Practices
DO:
- Use HMAC signing to verify authenticity
- Return 200 OK responses quickly (process async if needed)
- Log webhook failures for debugging
- Test with ngrok/localtunnel during development
DON'T:
- Expose webhook URLs publicly without signing
- Process heavy logic synchronously (timeout risk)
- Ignore failed webhook deliveries
- Hardcode secrets in your code (use environment variables)
Digest Scheduling: Batch Alerts vs Instant Notifications
Not every broken link needs instant notification. Sometimes you want digest reports instead.
Understanding Digest Scheduling
DeadLinkRadar supports:
Instant Alerts:
- Send notification immediately when link breaks
- Best for critical links (payment, affiliate, product pages)
- Can be noisy if you monitor 1000+ links
Hourly Digests:
- Batch all broken links detected in the past hour
- Sent at the top of each hour
- Good balance between urgency and noise
Daily Digests:
- Single email/notification per day with all broken links
- Sent at 9 AM in your timezone (configurable)
- Best for non-critical links (blog posts, reference links)
Weekly Digests:
- Single report every Monday morning
- Summarizes link health for the week
- Best for audits and trend tracking
Configuring Digest Schedule
- Go to Settings → Notifications → Digest Schedule
- Select your preference:
- ☑️ Instant alerts (default)
- ☑️ Hourly digest
- ☑️ Daily digest at 9:00 AM
- ☑️ Weekly digest on Mondays
- Click Save
You can enable multiple digest types simultaneously:
- Instant alerts for critical links
- Daily digest for all other links
- Weekly summary for reporting
Digest Content
Digest notifications include:
Summary:
- Total links checked
- New broken links detected
- Fixed links (previously broken, now working)
- Overall link health score
Detailed List:
- Each broken link URL
- Status code (404, 500, etc.)
- When it was detected
- Page where it appears (if tracked)
Quick Actions:
- Mark all as reviewed
- Export to CSV
- View full report in dashboard
When to Use Each Digest Type
| Digest Type | Best For | Example Use Case |
|---|---|---|
| Instant | Critical links | Payment gateway, affiliate links, product pages |
| Hourly | Important but not urgent | Customer support docs, pricing pages |
| Daily | Routine monitoring | Blog posts, reference links, image URLs |
| Weekly | Audits and reporting | Monthly review, trend analysis, team reports |
Digest Best Practices
DO:
- Use instant alerts for revenue-impacting links
- Batch non-critical links into daily digests
- Review weekly summaries for trends
- Adjust digest times to match your workflow
DON'T:
- Use only daily digests for critical links (too slow)
- Enable instant alerts for 10,000+ links (notification overload)
- Ignore digests for weeks (defeats the purpose)
Alert Customization: Filtering What Matters
Not all broken links are created equal. DeadLinkRadar lets you customize which alerts you receive.
Link Priority Levels
Assign priority levels to links:
Critical (🔴):
- Payment gateways, checkout flows
- Affiliate links generating revenue
- Core product pages
- → Always send instant alerts
High (🟠):
- Customer support docs
- Pricing pages, feature pages
- Blog posts with high traffic
- → Hourly or instant alerts
Medium (🟡):
- Standard blog posts
- Reference documentation
- Social media links
- → Daily digests
Low (🟢):
- Archived content
- Legacy pages
- Test links
- → Weekly digests or ignore
Filtering by Link Type
DeadLinkRadar categorizes links automatically:
External Links:
- Links to third-party sites
- Most prone to breaking
- Configure alerts per domain (e.g., always alert if
stripe.comfails)
Internal Links:
- Links within your site
- Easier to fix (you control the content)
- Usually less urgent than external links
Media Links:
- Images, videos, PDFs
- Can impact user experience but not always critical
- Consider daily digests instead of instant alerts
Alert Filters in Settings
Go to Settings → Notifications → Alert Filters to configure:
Status Code Filters:
- ☑️ Notify on 404 Not Found
- ☑️ Notify on 500 Internal Server Error
- ☑️ Notify on timeout/DNS errors
- ☐ Ignore temporary errors (503, connection timeouts)
Domain Filters:
- ☑️ Alert for specific domains (e.g., payment gateways)
- ☐ Ignore known flaky domains (e.g., social media embeds)
Link Age Filters:
- ☑️ Alert if link worked recently (broken in last 24 hours)
- ☐ Ignore links broken for >30 days (probably known issues)
Advanced Filtering with Tags
Tag links during setup:
Tag examples:
revenue-critical- Instant alerts, high prioritycustomer-facing- Hourly alertsinternal-only- Daily digestslegacy- Ignore or weekly reports
Then configure alerts per tag:
- Send instant alerts for
revenue-criticaltagged links - Send daily digests for
internal-onlytagged links
Filtering Best Practices
DO:
- Start with all alerts enabled, then filter out noise
- Review "ignored" links monthly (they may become important)
- Use tags to organize links by priority
- Adjust filters as your site evolves
DON'T:
- Filter out all 404s (you'll miss real issues)
- Ignore external links entirely (many are critical)
- Over-complicate filters (keep it simple)
Testing Your Notification Setup
Before relying on your alerts, test them thoroughly.
Step 1: Send Test Notifications
For each channel you configured:
- Go to Settings → Notifications → [Channel Name]
- Click Send Test Notification
- Verify you receive the notification
- Check that action buttons work (if applicable)
Step 2: Trigger a Real Alert
To test with an actual broken link:
- Add a test link to your monitoring:
https://example.com/this-will-404 - Wait for the next check cycle (or manually trigger a check)
- Verify you receive an alert when the link is detected as broken
- Test the "Mark Fixed" action
Step 3: Verify Digest Timing
If using digest scheduling:
- Note the current time
- Wait for the next digest cycle (hourly/daily/weekly)
- Verify the digest arrives at the expected time
- Check that it contains all broken links from the period
Step 4: Test Multi-Channel Setup
If you enabled multiple channels:
- Verify you receive alerts on all channels
- Check that timing aligns (instant vs. digest)
- Ensure no duplicate notifications
Troubleshooting Common Issues
Email alerts not arriving:
- Check spam/promotions folders
- Verify email address is correct
- Check if you accidentally unsubscribed
- Ensure email provider isn't blocking notifications
Discord/Slack webhooks failing:
- Verify webhook URL is correct
- Check that webhook hasn't been deleted
- Ensure channel still exists
- Test webhook directly with
curlor Postman
Telegram bot silent:
- Verify bot token and chat ID are correct
- Check that you started a chat with the bot
- Ensure bot wasn't blocked
Teams notifications missing:
- Verify webhook hasn't been disabled
- Check Teams channel permissions
- Ensure connector is still configured
Generic webhook errors:
- Check webhook endpoint is reachable
- Verify endpoint returns 200 OK
- Check signature verification logic (if using HMAC)
- Review webhook logs for errors
Testing Checklist
Before considering your setup complete:
- Test notification sent successfully on all channels
- Real broken link triggers alerts as expected
- Digest timing is correct (if enabled)
- Action buttons work (Mark Fixed, Ignore, etc.)
- No duplicate notifications across channels
- Alert filters work as configured
- Webhook signature verification works (if applicable)
- Mobile notifications arrive on phone (Telegram, Discord, Slack apps)
Best Practices for Broken Link Alert Strategies
Here's how to optimize your notification setup for maximum effectiveness.
Strategy 1: Tiered Alerting
Use different channels for different priorities:
Tier 1: Critical (Instant + Multiple Channels)
- Payment gateways → Email + Slack + Telegram
- Affiliate links → Email + Discord
- Product pages → Email + Teams
Tier 2: Important (Hourly Digest)
- Customer docs → Email
- Pricing pages → Slack
Tier 3: Routine (Daily Digest)
- Blog posts → Email
- Reference links → Weekly summary
Strategy 2: Team-Based Alerting
Route alerts to the right people:
Engineering Team:
- Slack/Discord channel
#engineering-alerts - Instant alerts for API/product pages
- Daily digest for docs
Marketing Team:
- Email to marketing@company.com
- Daily digest for blog posts
- Weekly summary for campaign links
DevOps Team:
- Telegram for instant critical alerts
- Teams for infrastructure-related links
- Webhook to PagerDuty for on-call escalation
Strategy 3: Alert Fatigue Prevention
Avoid overwhelming your team:
DO:
- Start with conservative filters (only critical links)
- Gradually expand monitoring as you tune filters
- Use digest schedules for non-critical links
- Review and archive old alerts regularly
DON'T:
- Enable instant alerts for 10,000+ links (notification storm)
- Ignore filters (you'll burn out from noise)
- Send all alerts to one channel (everything gets buried)
- Forget to test your setup (surprises during incidents)
Strategy 4: Automation Workflows
Use webhooks to automate responses:
Auto-Create Tickets:
- Webhook → Jira/Linear → Auto-create "Fix broken link" task
- Assign based on link type (marketing vs. engineering)
Auto-Fix Common Issues:
- Webhook → Lambda function → Check if known issue
- Update link automatically if possible (e.g., updated affiliate URL)
Escalation Workflows:
- Webhook → Check link priority
- If critical + broken >1 hour → Page on-call engineer
Strategy 5: Regular Review and Tuning
Your alert strategy should evolve:
Monthly Review:
- Check alert volume per channel
- Identify noisy alerts (too many false positives)
- Adjust filters or digest schedules
Quarterly Audit:
- Review link priorities (are they still accurate?)
- Update team routing (people change roles)
- Test all notification channels (webhooks expire)
After Major Changes:
- Site migration → Expect more alerts, adjust filters
- New product launch → Add new critical links
- Team reorganization → Update channel routing
Measuring Alert Effectiveness
Track these metrics:
Response Time:
- How long from alert to fix?
- Goal: Less than 1 hour for critical, less than 24 hours for important
False Positive Rate:
- What % of alerts are not real issues?
- Goal: Less than 10% false positives
Alert Fatigue:
- Are alerts being ignored?
- Survey team: "Are alerts useful?"
Link Health Trends:
- Are broken links decreasing over time?
- Goal: Less than 5% broken link rate
Conclusion: Stay Ahead of Broken Links
Broken links fail silently, but with the right alert setup, you'll catch them before they hurt your SEO, revenue, or user experience.
What we covered:
- Why alerts matter - The cost of late detection (SEO, revenue, trust)
- 6 notification channels - Email, Discord, Slack, Telegram, Teams, Webhooks
- Digest scheduling - Instant vs. hourly vs. daily vs. weekly
- Alert customization - Filtering by priority, status, domain
- Testing your setup - Verification and troubleshooting
- Best practices - Tiered alerting, team routing, automation
Next steps:
- Set up your first channel - Start with Email or Telegram (easiest)
- Add 5-10 critical links - Payment, affiliate, product pages
- Test notifications - Trigger a real alert
- Expand gradually - Add more links and channels as you tune filters
Remember:
- Start simple (one channel, critical links only)
- Test before relying on alerts
- Tune filters to prevent alert fatigue
- Automate where possible (webhooks + workflows)
With DeadLinkRadar's flexible notification system, you'll never discover broken links too late again.
Ready to set up broken link alerts? Start monitoring your links now →
Questions about notifications? Check our FAQ or contact support.
Related Guides
- Weekly Email Digest Setup - Automated weekly health reports
- RSS Feed Link Monitoring - Monitor via RSS readers
- Link Status History Tracking - See when and why links break
- Broken Link Checker: Complete Guide - Master link monitoring